Counter
We start by the simple example of a counter. A counter does not have asynchronous actions so Redux Ship is not necessary here, but it helps to get started.

Create a React application
Use create-react-app to create a counter application:
create-react-app counter
You should have the following files in src/:
App.css
App.js
App.test.js
index.css
index.js
logo.svg
Install Redux and Redux Ship with their dev tools:
npm install --save redux redux-ship redux-logger redux-ship-logger babel-polyfill
Optionally setup the Flow type system:
npm install -g flow-bin
flow init
flow
Model
We add a model.js file to describe the "Redux part" of the counter:
// @flow
export type State = number;

export const initialState = 0;

export type Commit = {
  type: 'Increment',
} | {
  type: 'Decrement',
};

export function reduce(state: State, commit: Commit): State {
  switch (commit.type) {
  case 'Increment':
    return state + 1;
  case 'Decrement':
    return state - 1;
  default:
    return state;
  }
}
This describes a quite standard reducer with typing. Notice that we name the actions Commit. This is to make clear that these actions are used to modify the state, by opposition to asynchronous actions.
View
In App.js we add the view of the counter:
// @flow
import React, { PureComponent } from 'react';
import './App.css';
import * as Controller from './controller';
import * as Model from './model';

type Props = {
  dispatch: (action: Controller.Action) => void,
  state: Model.State,
};

export default class App extends PureComponent<void, Props, void> {
  handleClickIncrement = (): void => {
    this.props.dispatch({type: 'ClickIncrement'});
  };

  handleClickDecrement = (): void => {
    this.props.dispatch({type: 'ClickDecrement'});
  };

  render() {
    return (
      <div className="App">
        <p>{this.props.state}</p>
        <button onClick={this.handleClickIncrement}>
          +1
        </button>
        <button onClick={this.handleClickDecrement}>
          -1
        </button>
      </div>
    );
  }
}
We display the value of the counter with <p>{this.props.state}</p>. To handle the clicks on the buttons +1 and -1 we dispatch actions to the controller.
Controller
We define the controller in controller.js:
// @flow
import * as Ship from 'redux-ship';
import * as Model from './model';

export type Action = {
  type: 'ClickIncrement',
} | {
  type: 'ClickDecrement',
};

export function* control(action: Action): Ship.Ship<*, Model.Commit, Model.State, void> {
  switch (action.type) {
  case 'ClickIncrement':
    yield* Ship.commit({type: 'Increment'});
    return;
  case 'ClickDecrement':
    yield* Ship.commit({type: 'Decrement'});
    return;
  default:
    return;
  }
}
The controller describes how to react to the application events, here a click on +1 or -1. We define a type Action which is the type of all these application events. The function control handles an action by returning a ship.
A ship is the description of a side effect, including API calls, modifications of the Redux state, timers, url update, or calls to third-party libraries with side effects. By side effect we mean "anything which is not purely functional". We define a ship with a generator and Redux Ship primitives.
We call:
yield* Ship.commit({type: 'Increment'});
to commit a commit to the Redux state. All functions in Redux Ship are called with yield*, you should never encounter a yield. We avoid the yield operator because it is a difficult to type in Flow, and instead call proxy functions with yield*.
The return type of control is:
Ship.Ship<*, Model.Commit, Model.State, void>
meaning that this controller is attached to our model. We could not for example run:
yield* Ship.commit({type: 'Foo'}); // error
as this would result in a Flow type error since {type: 'Foo'} is not of type Model.Commit.
Wrapping everything up
We instantiate a Redux store together with the Redux Ship middleware in store.js:
// @flow
import {applyMiddleware, createStore} from 'redux';
import * as Ship from 'redux-ship';
import createLogger from 'redux-logger';
import {logControl} from 'redux-ship-logger';
import * as Controller from './controller';
import * as Model from './model';

function runEffect() {}

const middlewares = [
  Ship.middleware(runEffect, logControl(Controller.control)),
  createLogger(),
];

export default createStore(
  Model.reduce,
  Model.initialState,
  applyMiddleware(...middlewares)
);
We provide two parameters to the Ship.middleware function:
runEffectwhich is empty for now, as we only have synchronous actions;logControl(Controller.control))which is our controller. We wrap it with alogControlto add loggin to the Redux Ship actions.
We bootstrap the application in index.js:
// @flow
import 'babel-polyfill';
import React from 'react';
import ReactDOM from 'react-dom';
import App from './App';
import './index.css';
import store from './store';

function render(): void {
  ReactDOM.render(
    <App dispatch={store.dispatch} state={store.getState()} />,
    document.getElementById('root')
  );
}

store.subscribe(render);
render();
We define a React render function to render the application. We subscribe to the store to re-render when the Redux store is updated. Note that you can also use react-redux to connect React to Redux.
Snapshots
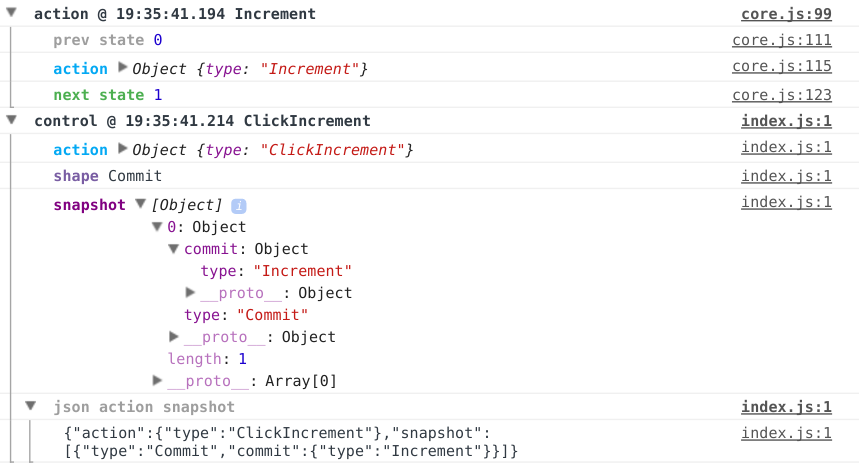
When we look at our browser's console we see something like:

We have an action {type: 'Increment'} which takes us from the state 0 to the state 1. This action is logged by redux-logger. We also have a line:
control @ 19:35:41.214 ClickIncrement
which is the log of our controller as given by redux-ship-logger. We see the snapshot of our controller:
[
  {
    type: 'Commit',
    commit: {type: 'Increment'}
  }
]
which is an array of one element, the commit of {type: 'Increment'}, describing all what the controller has done. Nothing fancy there, but the snapshots of our controllers will become increasingly useful as we design more complex controllers.
Let us move to the HTTP Request section to see how to make asynchronous actions.